• Home
  • About Me
  • Policies
  • Work with Me
  • Guest Posting
Stuff Parents Need

Stuff Parents Need

Easing the chaos in the nest, one find at a time.

  • Style
  • Parenting
  • Giveaways
  • The Kitchen
  • DIY Projects
  • Fun Things To Do
  • My Favorite Finds

Happy Kids, Happy Kitchen: Kid-Friendly Comfort Food with No Mess!

February 28, 2013 · by Tiffany Merritt · 21 Comments

One Bite Rule

For a good long while, my husband and I have been awfully smug about what an adventurous eater our oldest is. We chalk it up to the “one bite” rule we have in our house. Darah must try one bite of everything offered for a meal. If she likes it, great! She can have more. If she doesn’t, we respect that and offer her something else that she will most definitely like. We go nuts any time she finds a new food to enjoy and celebrate, and I think for that reason, she has tried and admitted to liking MANY things.

Well, my friends, that one bite rule is starting to lose its shine. Or perhaps Darah is just getting wise to how to ensure she gets what she actually wants for dinner. Lately I have found myself making dinner for her  2 and 3 times before she is content.

Something’s Gotta Give

Yeah….we’re gonna need to put a stop to that! I’ve got some ideas for changes we will be implementing moving forward (one bite for every birthday and no alternative if I have seen her eat and enjoy the dish before).  As we all get used to the new rules, though, I also want to serve some meals that are sure to please any 3 year old, and also leave mom and dad with happy bellies. So I’m going to be adding some kid-friendly comfort foods to our rotations.

Recently I made an entire meal that kids would love, and I think your family will love it, too! I made slow cooker mac and cheese, homemade fish sticks (I swear….TOTALLY easy) and s’mores from the oven for dessert. I used different Reynolds products to help me out. They made all the difference between dinner prep being a complete kitchen wrecker and it being not the least bit messy. Can I show you? Let’s do it!

Slow Cooker Mac and Cheese to Please

First up, the mac and cheese. I basically made this recipe up based on what I had available in my home. You can adapt it to your own preferences.

kid-friendly mac and cheese ingredients

Here’s what I used:

  • 4 cups uncooked macaroni noodles
  • 16 oz (half the container) Velveeta queso blanco cheese, cut into pieces
  • 3 cups shredded cheese of your choice
  • 4 oz butter, cut into pieces
  • 2 3/4 cups milk
  • Reynolds Slow Cooker Liner

slow cooker liner mac and cheese

The very first and most important step in making this dish is to use a Reynolds Slow Cooker Liner. If you aren’t convinced that these are needed, especially for a recipe like this, just you wait. I’ve got a picture later on that will convince you! After your liner is in place, simply layer half of the macaroni, half of the butter, half of the shredded cheese and half of the Velveeta cheese. Then repeat these layers one more time, and pour all the milk on top. When I made this recipe I used 2 1/3 cups milk and I believe it needed more liquid, so I adjusted the amount to 2 3/4 cups for the recipe. That’s how I will make it the next time!

Then you set the slow cooker on low for 4 hours. At the 2 hour mark, the mac and cheese will look like this:

slow cooker liner mac and cheese 2

Give it a quick stir and then put the lid back on and let it finish cooking! Two hours later, you have some seriously delicious mac and cheese. The outer rim of the dish has browned mac and cheese. That’s my husband’s favorite part, and even I have to admit, browned cheese is DELICIOUS. But it is most definitely NOT fun to clean. Just try to imagine if what you see below was sticking to the side of your slow cooker:

slow cooker liner

This would have been one of those epic messes that would have given me pause to consider if I should just give up and get a new slow cooker. But with my Reynolds Slow Cooker Liners, clean up took 2 seconds, as that is how long it takes to remove the bag once the food it out. I actually cackled with glee as I “cleaned up.”

I also made fish sticks for the family. For all of you “non-foodies” out there, don’t skip this part! If you don’t already know, I’m TOTALLY not a professional cook. Not even close. In fact, I’ve never attempted making fish sticks on my own because anytime I try to bread anything at all, I just end up with a huge mess and very disappointing food. But I did a little research and I learned some great tips that made this dish painless, mess-free and a total winner.

Idiot-Proof Homemade Fish Sticks

kid-friendly fish sticks with parchment paper

Here’s what you’ll need:

  • 1 to 1 /2 pounds firm white fish (I used tilapia)
  • 1 cup flour, lightly seasoned with salt and any other seasonings you like
  • 1 1/2 cups bread crumbs
  • 2 eggs, beaten and in a shallow pan (I used a pie plate)
  • Reynolds Parchment Paper
  • Reynolds Aluminum Foil

Line your work surface with Reynolds Parchment Paper. This stuff is not only great for baking, but it also helps when you have some messy work you need to do in the kitchen. It is very easy to work on top of and as you’ll see later, it is a real winner when dinner prep is over.

Once I had my parchment paper out, I laid out my fish which I had cut into smaller “fish stick” portions. I did opt to make them significantly bigger than those skinny fish sticks that you buy at the grocery store. The size you cut them to is strictly your preference. I also had my pile of flour (which I seasoned right there on the paper) and my pile of breadcrumbs laid out. And then I had my beaten eggs in a pie plate. I was so happy to see how few dishes I was using for such a messy endeavor. Yay parchment paper!

making fish sticks using parchment paper

You will first want to dredge every piece of fish in the flour. Shake off the excess. I suggest doing this step for all the fish first rather than taking each piece of fish through the entire breading process because it saves your hands from getting as messy as fast. I also think it is just a good thing for the flour to have a minute to sit on the fish before it gets dipped in egg and breadcrumbs. I believe it made the breading stick better.

Ok, so once all your fish is floured, then you do take each individual piece and dip it in the egg wash (make sure all sides get covered) and then dip it in the breadcrumbs, also making sure all sides get covered. This part is totally fun, though you will need to stop and wash your hands a few times.

breading fish sticks using parchment paper

Place your breaded fish sticks on a baking sheet. Here’s another tip to make cleanup even easier: line the baking sheet with aluminum foil and then spray it with a nonstick spray. This worked LIKE A CHARM and made flipping the fish sticks so easy.

fish sticks with aluminum foil

Next you’ll want to put the fish sticks in the oven that has been preheated to 450 for 8 minutes. At that point, remove them, flip them over, and then let them cook for 8-9 minutes more. If you opted to make very tiny fish sticks, you may want to watch them a bit more closely, as they may not need quite as long as mine took to be finished.

kid friendly fish sticks using Reynolds products

The end result are beautifully browned, beautifully crunchy fish sticks with a breading that doesn’t fall off (hallelujah!). MAJOR hit at my house.

And here’s clean up for that messy meal:

clean up with parchment paper

I mean, it almost feels like cheating. All that mess is gone in mere seconds.

Since I didn’t have to spend 30 minutes cleaning the slow cooker and my counters, I could make some dessert! What’s more kid-friendly that s’mores? And no, I didn’t go outside and make a camp fire. I just fired up my oven and reached, once again, for my new BFF, Reynolds Parchment Paper.

6 Minute S’mores

Here’s what you’ll need:

  • Chocolate bars of your choice cut into chunks
  • graham crackers
  • large marshmallows
  • Reynolds Parchment Paper

Will it gross you out if I tell you that I used the same baking tray that cooked the fish sticks without first washing it for these s’mores? Well I did! And there was no need to wash it as the aluminum foil contained all the fishy stuff…that baking sheet was as clean as can be!

So, you line your baking sheet with parchment paper. I used the baking sheet as a guide for the size of the paper, and then I just folded under any excess so that it wasn’t hanging off the sheet. You could also use scissors to remove the excess paper if you are not as lazy as me. 😉

oven s'mores using parchment paper

Preheat your oven to 350. Lay out as many graham crackers as you want. We made 8, which was way too many. And then we ate them all, anyway (don’t act like you wouldn’t do the same!). On each cracker, place your chocolate. Make sure it doesn’t hang over the side or you’ll have a serious mess.

Then take your marshmallows and give them a pretty decent squish with your hands, like this:

how to make s'mores with parchment paper

Since they tend to expand a bit in the oven, I find that squishing them before you bake them helps them not get out of control.

You then bake the s’mores, WITHOUT the graham cracker top on them, for just 5 minutes! Remove from the oven, and add the top graham cracker. Give it a little smush, and then get ready for all the awesome.

s'mores using parchment paper 2

You’ll probably have a little chocolate and marshmallow run over the edges. No worries. The parchment paper catches it all, and I can say from experience that it is REALLY easy to lick melted chocolate and marshmallow off parchment paper.

And just in case you are wondering, the slow cooker and the twice used baking sheet both got put away without so much as a rinse under the faucet. That’s how this Reynolds Real Mom does it!

Need more inspiration. Here’s a great post with tips for weeknight meals.

I am a #ReynoldsRealMoms finalist. I have received complimentary products and am in the running to be an ambassador for the company for the remainder of the year! Please go to the Reynolds Facebook page to meet the other finalists, learn fantastic tips and tricks like the ones in this post, and to vote for your favorite (voting is held every Wednesday).


Filed Under: Popular Post, The Kitchen · Tagged: baked s mores, crockpot liners, homemade baked fish sticks, homemade fish sticks, homemade fish sticks recipe, homemade macaroni and cheese, kitchen tips and hints, kitchen tips for cooking, macaroni and cheese, macaroni and cheese recipe, reynolds, reynolds crockpot liner, reynolds facebook, reynolds foil, reynolds parchment, reynolds real moms, reynolds real moms contest, reynolds slow cooker liners, slow cooker mac and cheese, slow cooker macaroni and cheese, slow cooker recipe, slow cooker recipes, smores in the oven

Time to Vote! New Reynolds Real Moms Tips and a Video Starring Yours Truly!

February 27, 2013 · by Tiffany Merritt · 1 Comment

It’s Wednesday, and that means I need your help today! Please take a moment to hop over to the Reynolds Facebook page and vote for me as your favorite Reynolds Real Mom finalist! To vote, be sure to “like” Reynolds, click on Tiffany Merritt (bottom row, second from the left) and then click on the left side where it says, “vote for me!”.

Reynolds has also released 10 new videos featuring the Real Moms finalists, and I think they are all really awesome! Here’s my video tip, below, demonstrating how to make a foil packet so that you can easily customize your meals. Foil packets are super easy and I find that the veggies in this dish taste outstanding. Definitely give it a try! And let me know what you think about the video. Should I call Paula Dean and tell her to look out? Ha ha!

Do you have any questions for Reynolds about their products? Any favorite kitchen tips and tricks you’d like to share with others? I’d love to hear! Thank you so much for your help with the voting! I couldn’t do this without you!

I am a finalist for the #ReynoldsRealMoms Ambassador campaign and as such have received complimentary products. All thoughts and opinions expressed here are strictly my own.

Filed Under: The Kitchen · Tagged: kitchen tips and hints, kitchen tips for cooking, reynolds, reynolds facebook, reynolds foil, reynolds real moms, reynolds real moms contest

A Bird in the Bag is Worth Two in the Bush: Conquering My Fear of Cooking a Whole Chicken

February 20, 2013 · by Tiffany Merritt · 20 Comments


Does Pinterest ever cause you to believe that you are something you aren’t? Whenever I am on the site, my mind somehow gets confused and starts to believe that I am an expert chef. I pin things left and right that call for fresh herbs, hard-to-find produce, gourmet cheeses and other such things that you will never find for Buy 1 Get 1 Free at my local grocery store. They also make use of kitchen gadgets I don’t own, and techniques I have never even attempted. But for some reason, I believe, at least for long enough to hit “re-pin” that I could totally make that stuff. The caption swears that it is “so easy!” after all.

And then after I step away from the delusional fog of Pinterest, I realize that I’m a real mom, with real time and budget constraints, and perhaps more importantly, with real culinary challenges.

For example, I am 32 years old and even though I cook for my family at least 5 days a week and have for the past decade, I have NEVER cooked an entire bird of any sort. I’ve always assumed that it was too gross and too hard.

But today, my friends, I overcame my reluctance and found a way to make a chicken that was honestly easy. I documented the whole process so that you can learn with me if you have never done this before!

So, here are my elements for our dinner. Notice the complete absence of all those gorgeous veggies from Martha’s version. I just don’t have time for all that, you guys!

Reynolds Oven Bags meal prep

I did, however, pick up some Reynolds Oven Bags, which are rumored to be a secret weapon of home cooks, as they make dinner much less of a chore and cleanup nearly effortless. Sign me up!

And look what I found when I opened my box!

Reynolds Oven Bags coupon

Saving me time AND money. You are seriously speaking my language, Reynolds.

Ok, so I printed off a recipe from the Reynolds website and was feeling super confident. I was about to stop being such a chicken about cooking a chicken!

stuffparentsneed.com Tiffany Merritt

Then I got to the part of the recipe where it told me to loosen the skin of the bird by massaging it with my fingers (why no, I didn’t read the recipe through before beginning…who actually does that?! Smart people….that’s who). This is how I felt about these instructions:

stuffparentsneed.com not wanting to make a chicken

And then I promptly went to the Reynolds website and found a rosemary and basil chicken recipe with no massaging required. Gotta walk before you can run, right?

 The first step was so much fun. Add a tablespoon of flour to your oven bag, close it with your hands and SHAKE, SHAKE SHAKE! I didn’t know this recipe would have a little bit of therapy wrapped into it. Mama worked out some aggression! 🙂

Reynolds Oven Bags with flour

Then I melted some butter and poured it on top of the chicken. Again, no massaging required!

Reynolds Oven Bags chicken with butter

Then I put together the spice mix that uses dried herbs. This may cause the hardcore foodies to wrinkle their noses, but not me! My fresh herb garden is not equipped to handle requests on account of it NOT EXISTING. Rosemary and basil were blended with salt and pepper for this lovely mix.

Reynolds rosemary and basil chicken herbs

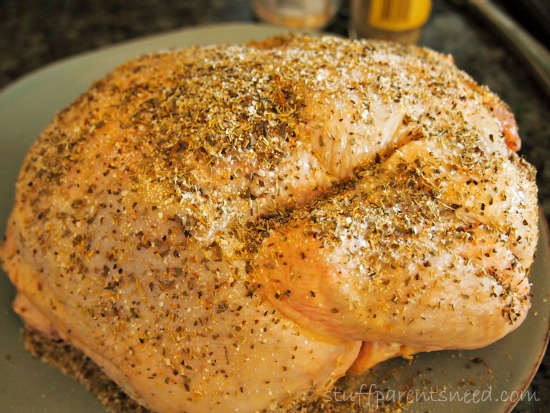
Now here’s the part where I actually had to touch the chicken. But really, it wasn’t so bad. I mostly sprinkled the herb mix on the chicken and just patted some on in the places that weren’t covered as well by my culinary fairy dust. And look how pretty!

Reynolds rosemary and basil chicken 1

Now all I had to do was put the chicken in the Reynolds Oven Bag and use the tie to secure it. You simply run the tie through the outer loop and the pull it through until it clicks on the tightest possible hinge. Super easy.

Reynolds Oven Bag tie


Then you poke roughly 6 holes in the bag (I stayed near the top) to provide some ventilation during the cooking process. Then tuck the top part of the bag under the chicken to secure it, and stick it in the oven which has been preheated to 350 and set your timer for 90 minutes.

Reynolds oven bags with chicken

While I waited for the chicken to cook, I also used the Reynolds Oven Bags to make the most scrumptious herbed corn-on-the-cob. And don’t be fooled by the name, people! Reynolds Oven Bags also work in the microwave! That’s how I used them to make the corn.

reynolds oven bags corn


Then it was time to clean up. Which of course, I loathe and despise. Just sayin’. But can I show you the pile of dishes I had after preparing the chicken AND the corn?

clean up after using Reynolds Oven Bags

That’s it! So those Reynolds Oven Bags really did save me a lot of time in the cleanup department. But just as importantly, they cooked the food BEAUTIFULLY! I may have eaten two pieces of corn before my family even knew dinner was ready. Don’t judge.

And I can I please show you what my very first cooked whole chicken looked like? I am SO STINKIN’ PROUD!

Roasted chicken using Reynolds Oven Bags

It is golden brown, juicy and perfectly cooked. See?

chicken cooked with Reynolds Oven Bags

Reynolds Oven Bags made cooking something I have feared for 10 1/2 years a total breeze, from start to finish. I am so impressed with just how easy it was! And now it has me thinking that cooking a turkey just might happen in the near future. A turkey!! The thing I swore I would NEVER even attempt! But now that I have my secret weapon and had such great success with so little effort, I’m ready.

Bring it on, bird.

I am a Reynolds Real Moms finalist and have received some complimentary Reynolds products as a thank you for my time. All thoughts, opinions, and culinary mishaps listed here are strictly my own! 

Filed Under: The Kitchen · Tagged: bake a whole chicken, cook a whole chicken, cook a whole chicken easy, cooking a chicken, how to bake a chicken, kitchen tips and hints, kitchen tips for cooking, recipes for whole chicken, reynolds, reynolds facebook, reynolds foil, reynolds real moms, reynolds real moms contest, simple chicken

Reynolds Real Moms: I So Desperately Need Your Help!

February 18, 2013 · by Tiffany Merritt · 4 Comments

In two days the Reynolds Facebook page and the Reynolds website are both going to be all abuzz with news of the Reynolds Real Moms. This is a team of 10 moms, some professional home cooks, and some not (I would be in the “NOT” category! Ha!). But we all have some great tips and tricks to share to help you get in and out of the kitchen faster.

reynolds real moms


I am the mom in blue just above the l in “Real.” Thanks to some photoshop magic, I actually look tall, when in fact I’m just over 5 feet. As I told my best friend, this fact alone makes it the best picture of my entire life!

Every Wednesday for the next 6 weeks, new posts will be up on the Reynolds Facebook page by each of the Real Moms. And you will have an opportunity to vote for your favorite at that time. At the end of the 6 weeks, 5 Real Moms will be selected to finish out the campaign for the rest of the year.

As a mom who does not value spending a lot of time in the kitchen, I have really become quite passionate about Reynolds products and how helpful they can be. As I have learned how to make better use of them, I’ve shaved time off my meal prep (and my cleanup!) again and again. I want so badly to get to share with you everything I know, not just over the next 6 weeks, but over the next year.

So I am on my knees begging you to PLEASE vote for me! As per the contest rules, I’m not allowed to offer you anything like extra giveaway entries in exchange for you vote (or else I totally would!). All I can promise you is good karma. If you have any suggestions for me for improvement I would be so grateful to hear them! I will submit another post on Wednesday with the link to the voting site. Can I count on you?

Filed Under: Featured · Tagged: kitchen tips and hints, kitchen tips for cooking, reynolds, reynolds facebook, reynolds foil, reynolds real moms, reynolds real moms contest

  • « Previous Page
  • 1
  • 2

Connect

  • Email
  • Facebook
  • Instagram
  • Pinterest
  • Twitter

Welcome!


Grab your beverage of choice (mine is iced coffee) and let's hang out for a spell! I'm Tiffany, and I've rambunctious little girls and a fierce desire to share any tip and trick I can find to make lives with little ones a bit less hectic and a lot more fun. [Read more...]

Popular Posts

Keep Slowing Down. You’ve Got a Race to Lose

Keep Slowing Down. You’ve Got a Race to Lose

Free Summer School for Moms (You’ll Love It!)

Free Summer School for Moms (You’ll Love It!)

The Best Cheap Mattress is Also The Best Quality Mattress: A Must-Read

The Best Cheap Mattress is Also The Best Quality Mattress: A Must-Read

25+ Moana-Inspired Easter Basket Ideas

25+ Moana-Inspired Easter Basket Ideas

The Book Every Child Should Own (And How to Get a Free Copy )

The Book Every Child Should Own (And How to Get a Free Copy )

Recent Posts

  • Choosing an Engagement Ring in a Changing Landscape
  • Personalized Clothing in Family Portraits: Showcasing Unique Style
  • The Psychology of Dual-Monitor Productivity: Why It Feels Easier to Work
  • The Secret to Style Confidence – Even During the Messiest Days
  • The Science of Healthy Hair: Foundations, Care, and Everyday Styling

Search

Sponsors

Copyright © 2026 | Innovative by The Pixelista | Built on the Genesis Framework


Loading Comments...