• Home
  • About Me
  • Policies
  • Work with Me
  • Guest Posting
Stuff Parents Need

Stuff Parents Need

Easing the chaos in the nest, one find at a time.

  • Style
  • Parenting
  • Giveaways
  • The Kitchen
  • DIY Projects
  • Fun Things To Do
  • My Favorite Finds

Irish Gold Cookies for Simple St. Patrick’s Day Goodies

February 16, 2014 · by Tiffany Merritt · 2 Comments

I am a Reynolds Real Mom, and as such, have been compensated for my time. All thoughts and opinions express here are mine, as always.

Everyone knows there’s a pot of gold at the end of the rainbow, and St. Patrick’s Day is the perfect occasion for making some edible treasures for your little leprechauns. Keep it simple this year with this easy and fun recipe for Irish Gold cookies.

irish gold st. patrick's day cookies
Ingredients
  • white frosting
  • green food coloring
  • Nilla Wafers
  • white baking chocolate
  • green and white sprinkles (I used Wilton)
  • Reynolds Parchment Paper

Lay out your parchment paper on a flat surface. This will be your assembly station; all the mess stays right here for easy cleanup!

irish gold cookies on reynolds parchment paper

Scoop about 1/3 of the frosting container into a separate bowl. Add green food coloring, a few drops at a time, until the frosting is the shade of green you like best.

Spread the frosting on the flat side of one Nilla wafer, and then add a second wafer on top to create a sandwich. Go ahead and remove any excess frosting that is sticking out of the side.

Once you have assembled your cookies (I made 16 at a time), heat your baking chocolate according to package directions. Once it is ready, dip the cookies, one at a time, until they are halfway covered with the chocolate. After you dip each cookie, sprinkle the covered side and top of the cookie with your green and white sprinkles. Then lay the cookie on your parchment paper. Repeat until all cookies have been half-coated and sprinkled.

irish gold st. patrick's day cookies in pot

Let the cookies sit for half an hour so the chocolate can harden. These are so fun to serve in a little black cauldron or pot, along with some chocolate gold coins and Rolos.

Filed Under: The Kitchen · Tagged: easy cookie recipes, irish gold cookies, irish gold cookies recipe, recipes, st patrick day recipes, st patricks day cookies, st patricks day desserts, st patricks day recipes, st patricks day treats

200+ Recipe Ideas You Can Download NOW

February 10, 2014 · by Tiffany Merritt · Leave a Comment

I just learned about a bundle of 5 ebooks that are on MEGA sale for just $7.40! That’s not the price per ebook, that’s the price for all 5 ebooks, and price is more than 85% off what you would pay if you bought them individually. The bundle includes the following:

BundleoftheWeek.com, 5 eBooks for $7.40!

▪ The Breakfast Revolution by Beth Ricci (over 40 easy-to-make breakfast ideas)

▪ The Veggie Book by Sara, Danielle, Debra, Kayla (over 50 veggie side dishes and dozens of healthy entrees)

▪ Better Than a Box by Katie Kimball (recipes for your favorite pantry staples)

▪ Back to School Slow Cooker Freezer Recipes by Stephanie Brandt Cornais

▪ Daily Desserts by Shaina Olmanson (50 recipes!)

If you don’t have a kindle or an ereader, you can still read these on your laptop by using Amazon’s cloud feature (totally free…that’s how I read ebooks!). Click the image above to get this super sweet deal and get dinner on the table with less hassle.

Affiliate links included. I only promote AWESOME. 😉 

Filed Under: The Kitchen · Tagged: cookbook ebook, cookbooks, download recipes, ebooks for kindle, online recipe book, recipe books, recipe ebook, recipe ebook sale, recipes, sale

A Favorite Kitchen Shortcut: Oven Pancakes

February 6, 2014 · by Tiffany Merritt · 17 Comments

Thanks to Ronco, a favorite around my home, for partnering with me on this post. All thoughts and opinions expressed here are strictly my own!

Friends, I love pinning gorgeous recipes on Pinterest every bit as much as you do, but when it’s time to roll up my sleeves and get to work in the kitchen, I almost always opt for recipes and shortcuts that will get me in and out of there FAST.

Ronco Pot-Sized Pasta

Ronco just launched a celebration of kitchen shortcuts, and has also released Pot-Sized Pasta to help things go a little faster during your meal prep. Have you seen it on the shelves, yet? It look like this:

ronco pot-sized pasta

So why do you need to purchase noodles that are half the length? Does that actually save you any time? Absolutely! When I have to break apart my pasta, a few different things happen:

  1.  I have to break it apart in groups, as I can’t get it all to come apart quickly.
  2.  Because I have to break it in groups I have to go as fast as possible so that all the pasta gets in the pot at pretty much the same time.
  3.  Because I have to go really fast,things get messy, and I always end up with noodles bits all over the counter and the floors. And that means more cleanup. Which means more time. 🙁
  4.  If I try to fit all of the pasta in the pot, I have to spend time squishing it down, little by little. That never works well, by the way, so I definitely don’t recommend doing it!

Ronco Pot-Sized Pasta goes straight into the pot, all at once, with no mess. It’s compact box also fits in the pantry nice and neat, which I love!

My Kitchen Shortcut

Ronco asked me to share with you one of my favorite kitchen shortcuts, and I knew instantly what I wanted to showcase: oven pancakes!

how-to-make-pancakes-in-the-oven1

I make 16 pancakes at one time, and spend ZERO time in front of the stove pouring, watching, and flipping. That’s because I make them all in the oven.

To make oven pancakes, follow the directions on the box of pancake mix (because boxed mix is already a shortcut!), and then pour that mix onto a greased baking sheet (with raised edges). I followed the instructions for making around 14 pancakes, just to give you an idea of how much you should make.

making pancakes in the oven pancake batter

It will look a little lumpy, but that’s ok, because you aren’t supposed to over-mix pancake batter.

The next step is to pop these into the oven, set to 325, for 15 minutes. At minute 13, I usually go back into the kitchen and switch the oven over to broil, just to give the pancakes a darker finished color. If you do that, you need to watch them for those last 2 minutes!

Remove the very large pancake from the oven, and cut into squares or rectangles, or you can even bust out some cookie cutters if you want to get really creative. One pan for me yields 16 pancakes, all ready at the exact same time!

oven pancakes

I absolutely love that I can go do other things while the pancakes are cooking. It saves me a TON of time, and a lot of frustration, too, as I tend to ruin at least 3 pancakes during my attempts to make them.


Filed Under: DIY Projects, Featured, Fun Things To Do, General, Giveaways, My Favorite Finds, Parenting, Parenting Tips, Style, The Kitchen, Uncategorized · Tagged: kitchen shortcuts, oven pancake, oven pancake recipe, oven pancakes, pancake recipes, pot pasta, quick pancake recipe, recipes, ronco, ronco pasta, ronco pot-sized pasta

Miniature Ice Cream Cupcakes: Even I Can Make These!

February 4, 2014 · by Tiffany Merritt · 4 Comments

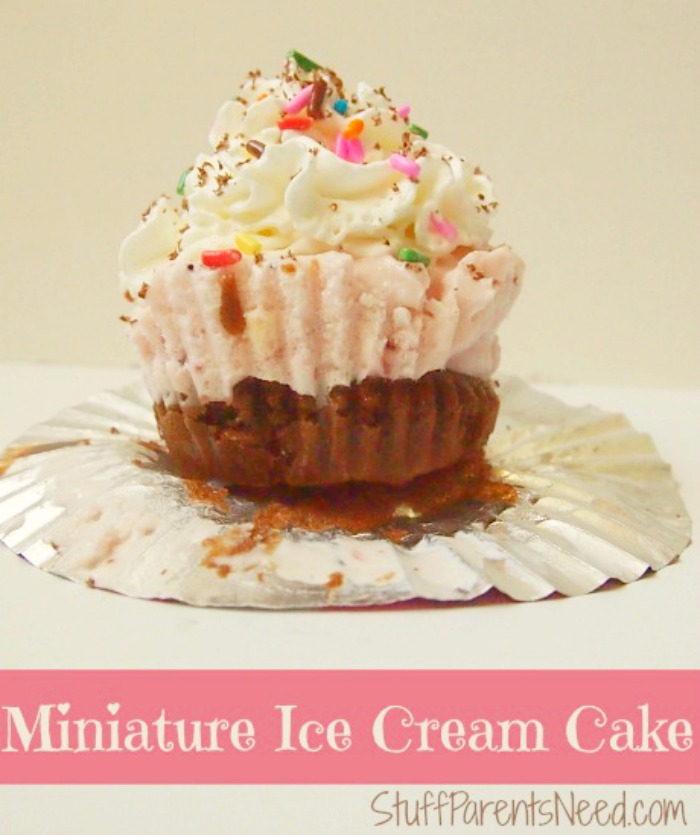
So last week when we had 3 snow days in a row, the kids and I got a little bored. And boredom is great fuel for creativity! We decided to do a little baking, but we also wanted to pay tribute to the freezing temps outside, so we knew we wanted to use ice cream. As we were digging around in the pantry for inspiration, we found some of our beautiful Reynolds Baking Cups, and an idea came to me: let’s make ice cream cakes in baking cups! And so, friends, I present to you, ice cream cupcakes!

  miniature ice cream cakes

Why not let cake and ice cream join forces for your next birthday party, or for any upcoming celebration (like Valentine’s Day!). They make for a tasty hand-held treat. And they are easy (if I can do you, you can do it!).

Ingredients:

  • Cake mix of choice, mixed according to package directions
  • Reynolds Stay-Brite Baking Cups
  • Ice cream of choice
  • Whip cream
  • Sprinkles, or other topping of choice (we love chocolate shavings)
 Preheat your oven according to the package directions for your cake mix. Line your muffin tin with Reynolds Baking Cups, and add 1 Tbsp of the combined mix to each baking cup. Bake for 10 minutes and then remove from the oven to cool completely.

base of ice cream cupcakes in Reynolds baking cups

 Once your cupcakes have cooled completely, add a scoop of ice cream to each baking cup. Be sure to pat it down a bit to ensure that theice cream is taking up all the remaining space inside the baking cup. Then return the ice cream cupcakes to the freezer until you are ready to serve.
Just before serving, add whip cream and the toppings of your choice. Enjoy immediately!
example of ice cream cupcake or miniature ice cream cake

Affiliate links may be included at no cost to you. As always, all thoughts and opinions are my own.

Filed Under: The Kitchen · Tagged: cupcakes, easy ice cream cupcakes, ice cream cupcakes, recipes, reynolds, reynolds baking cups

Sharing #BaconLove with My All-Time Favorite Bacon Recipe

January 21, 2014 · by Tiffany Merritt · 16 Comments

This post was created in partnership with Bi-Lo. All thoughts and opinions expressed here are strictly my own.

At my local grocery store, Bi-Lo, there is a BIG celebration going on, and it is all about bacon.

Awww yeah! #BaconLove is spreading like wildfire! And honestly, what’s not to love about the food also known as “meat candy?” Bi-Lo has some really great deals happening right now on all things bacon, so if you live in the part of the country that has a Bi-Lo, don’t miss out on your chance to go “hog wild” (Snort snort)!

In celebration of this event, Bi-Lo asked me to share my favorite bacon recipe, and I didn’t even have to think for a second before I knew what I’d be sharing. Friends, today I’m going to teach you how to make this:

best spaghetti carbonara recipe

Aside from cold cereal, which will always be the culinary equivalent of my first love, spaghetti carbonara is my favorite meal. I would eat this twice a week for the rest of my life with absolutely no complaints. Please understand that as a general rule, I don’t make the same dish in my home more than once every six months. I can’t stand to eat the same food frequently (yes, it is every bit as annoying as it sounds…I curse myself daily for needing so much variety). Anyway, the point is, for me to have a food other than cereal that I will eat so often is a REALLY. BIG. DEAL. And that’s because it is just that good.

And what makes it so good?  The bacon, of course!

So here’s what you need to get started:

bacon love spaghetti carbonara ingredients 1 package bacon

1 lb spaghetti noodles

2 eggs, cracked and scrambled in a bowl (but not cooked!)

4 Tbsp butter

4 Tbsp olive oil

4 cloves garlic, minced

handful of fresh parsley (roughly 1/3 cup) (spring for the fresh stuff…it’s worth it!)

1/3 cup Parmesan or Romano cheese, grated

bacon for spaghetti carbonara

Preheat oven to 400 degrees. Line 2 baking sheets with aluminum foil, and arrange bacon on the sheets. Once the oven is preheated, cook the bacon in the oven for 15-20 minutes (start watching it at the 15 minute mark). Such an easy way to get perfectly crisp bacon! While the bacon is doing its thing, get some water boiling for your spaghetti. Once you have a rolling boil, cook your noodles for the time indicated on the package.

chopped parsley for spaghetti carbonara

While your noodles are cooking, go ahead and get your parsley chopped. I use kitchen shears to get the job done fast! Now’s also the time to grate your cheese, get your eggs cracked and scrambled in the bowl, and to start heating up the olive oil and the butter in a pan. Once the oil/butter combo is hot, add the garlic and cook it for a few minutes until it turns golden.

cooked bacon for spaghetti carbonara

By this point, the bacon might be done. if so, remove it from the oven, and once it is safe to touch it, get it all nice and crumbled (once again, I used the kitchen shears!). Set crumbled bacon to the side.

Now your noodles should be done. This is where things are about to get intense, as you’ll need to do all the remaining steps fairly quickly. Ready? Here we go! Drain the cooked noodles and then return them to the pot. Add the butter/oil/garlic mixture to the pot and give it several quick stirs. Then add the scrambled raw eggs to the pot and STIR! STIR! STIR! The eggs are basically going to cook all over the noodles. You want egg-coated noodles, and not chunks of egg in your noodles. Stirring quickly is the key to success here.

stirring spaghetti carbonara noodles

Once you feel like you’ve got a good coating on your noodles, it is time to add all the other stuff (parsley, cheese and bacon) and mix it around a bit. And this is your end result!

spaghetti carbonara finished product

The taste is absolutely incredible, friends! Don’t be intimidated by the crazy egg stirring step, and don’t be weirded out by how it sounds, either. Just trust me on this one and spread some #BaconLove to your family this week by giving it a try!

And since you already be interested in pasta dishes with bacon, definitely check out the Bacon with Butternut Squash Penne recipe. It’s SO yum!

What’s your favorite bacon recipe? Do tell! 


Filed Under: Popular Post, The Kitchen · Tagged: #baconlove, bacon recipe, bacon recipes, bi lo, carbonara recipe, recipes, spaghetti carbonara, spaghetti carbonara recipe

Miniature Pecan Pies, Magical Scotch-Brite Dishwands, and Cleaning Confessions

January 6, 2014 · by Tiffany Merritt · 129 Comments

This post highlighting recipes with tricky cleanup has been compensated by Scotch-Brite. All thoughts and opinions are my own, as always.

I’m sure many of you out there have a list (or more accurately, a Pinterest board) overflowing with awesome recipe ideas that you just haven’t gotten around to trying yet. I know I certainly do.

In particular, I have quite a few recipes that I seem to be dragging my feet to try for one simple reason: I judge clean up for these dishes to be a nightmare. Any food that is served in a glass, that has marshmallows that have been heated, that has a flaky crust in a small container or that involves syrup in significant quantities keeps getting passed over by me because however good the recipe may be, I’ll be annoyed that I made it when it is time to scrub the dishes.

Follow Stuff Parents Need’s board #ScotchBrite Yummy Recipe Possibilities on Pinterest.

Scotch-Brite recently challenged me to create a Pinterest board with exactly those types of dishes: the ones I’d really love to eat, and even ones I’m willing to make, as long as I don’t have to do dishes afterwards. I was also challenged to actually make one of those recipes, and then face the dreaded dish pile afterwards with the Scotch-Brite Stay Clean Dishwand in hand. The folks at Scotch-Brite were confident that with the right tools, washing those dishes would be a breeze.

Y’all, I’ve cleaned a lot of plates (in Memphis! Like Tina!) so I was not as confident. But I’m always up for a challenge, especially if it means that I get to eat something super yummy.

Miniature Pecan Pies

I reviewed my options, and at the end of the day, just couldn’t stop thinking about those adorable rustic ramekin pecan pies. Head over to Bev’s site to get the recipe (it’s a good one!) if you’d like to give it a try. I’ll show you the process I went through to make the pies, and I think in so doing, you’ll see the increasing level of “Ugh!” I was facing as clean up time neared.

Scotch Brite miniature pecan pie 1

First I cut out the dough to fit the inside of the ramekin (accomplished by using a bowl that was slightly larger than the ramekin). So the inside of my dish is covered in dough, which is flaky, crusty, delicious, and a bear to clean.

Scotch-Brite miniature pecan pie 2

But, you know what? That’s not enough crust! Time to put some around the edges! I actually totally agree with Bev on this concept, and I loved the fact that the pie is supposed to look “rustic” so it is ok for the crust to not be nice and neat. But now I’ve got pie crust on the inside AND the outside of the dish.

Scotch-Brite miniature pecan pie filling

Time to make the filling! Various yummy and sticky things go into a pecan pie filling, including eggs, sugar, lots of syrup, and to put a little pink in your cheeks, some bourbon (in my case, I used Chattanooga Whiskey…keepin’ it local!). My main concern with stuff like this is that it may come off the bowl, but then it will just be stuck to the sponge. Gross.

Scotch-Brite miniature pecan pies

The finished product was totally cute and yes, absolutely delicious. My family enjoyed every single bite.

Cleaning up with Scotch-Brite Stay Clean Dishwand

I got my Scotch-Brite Stay Clean Dishwand all ready to go. It is especially designed to keep the food off the dishes AND off the sponge, which means that it can go the distance for you without having to be replaced quite so quickly. I had the perfect tool on hand for the job, so no need to dally, right?

#ScotchBrite stay clean dishwand

The Part Where I Totally Embarrass Myself

Only I did dally. I dallied like it was going out of style. Honest truth time: I was nervous that the dishwand wouldn’t work as advertised, and that I’d ruin my new kitchen helper on its very first mission. Between the crust, the gooey filling, and the sticky leftovers in the prep bowl, what sponge wouldn’t have to sacrifice itself for that mess??? Also, I hate doing dishes, so that contributed to my procrastination, for sure.

Those dishes sat for 3 full days. And actually, they sat longer than that but I’m just too embarrassed to tell you how long. I avoided this chore like the plague, and in so doing, really just made my poor, cute little dishwand’s job infinitely harder.

scotch brite stay clean dishwand preparing for use

And yet, she seemed undaunted (and perhaps even a little giddy) about her assignment (What? Dishwands totally show their emotions, you guys). I put her durable scrubbing surface to work, and what I thought was going to be a horrible chore seemed to be more like a fun game to this dishwand.

scotch brite stay clean dishwand cleaning a bowl

Even the crusty ramekins didn’t see to phase her, and bowl after bowl, the dishes were coming clean.

scotch brite stay clean dish wand food not sticking

When it was all said and done, I realized that I put off a chore that wasn’t hard at all, thanks to having the right tool on hand. And was the dishwand scrubber ruined by all the sticky stuff it had to clean? On the contrary…it hardly looked used at all!

scotch brite dishwand after cleaning

So now I’ve got a new best friend in the kitchen, and my hand washing dishes aren’t piling up for a week 3 days like they used to. The Scotch-Brite Stay Clean Dishwand is easy to use, actually works the way it claimed it would, and is priced nicely at just $2.99 for the dishwand and $4.49 for a 3 pack of refills (though it will take a while for the sponge to wear out!). The sponges are also designed to fit any Scotch-Brite wand, so if you purchase a different dishwand and want to try out these sponges, that’s no problem!

What awesome recipe are you going to try now that you know cleaning up will be easy??? 

Win it!: One lucky Stuff Parents Need reader will win the full suite of Scotch-Brite dishwands!

Be sure to enter my other current giveaways, found on the sidebar of my site.

a Rafflecopter giveaway

Filed Under: Giveaways, The Kitchen · Tagged: clean sticky dishes, mini pecan pies, miniature pecan pie recipe, miniature pecan pies, pecan pie, recipes, review, scotch brite, scotch brite dishwand, scotch brite review, scotch brite stay clean, scotch brite stay clean scrubbers, scotch-brite stay clean dishwand

How to Bake the Perfect Sugar Cookie

December 18, 2013 · by Tiffany Merritt · 2 Comments

My friends over a Reynolds just put together a great tutorial on how to make the perfect sugar cookie. I found it useful, so I thought I would share it with you! Happy baking, everyone!

how to bake sugar cookies

Filed Under: The Kitchen · Tagged: how to bake sugar cookies, how to make perfect sugar cookies, perfect sugar cookie, perfect sugar cookie recipe, perfect sugar cookies, perfect sugar cookies recipe, recipes, reynolds, sugar cookie recipes, sugar cookies

Healthy Tuna Recipes: Mediterranean Tuna Salad with #OceanNaturals

December 12, 2013 · by Tiffany Merritt · 5 Comments

I am a member of the Collective Bias®  Social Fabric® Community.  This shop about healthy tuna recipes has been compensated as part of a social shopper insights study for Collective Bias and their client. All thoughts and opinions are my own, as always. 

#shop #oceannaturals Mediterranean tuna salad 5

Discovering Ocean Naturals Tuna

Last week I had to pick up some items at Walmart for holiday prep (we finally ran out of gift tags…about 8 years ago I purchased approximately 1.5 million tags at a 90% off sale). Anyway, I also wanted to get some ingredients  so that I could make some healthy tuna recipes to keep in the fridge for snacking throughout the day. I’m definitely a grazer, and it is up to me to make sure I have tasty and healthy options at hand so that I don’t find myself working through a bag of chocolate chips. Not that I’ve ever done that, or anything.

I spotted a new tuna product on the shelves called Ocean Naturals and I was definitely intrigued. It is responsibly caught tuna that doesn’t contain any additives or fillers. What you find when you open a can is wild premium tuna, a dash of salt, and water or oil, depending on which can you purchased. You can even learn more about where the specific tuna you are eating came from by visiting http://oceannaturals.com/my-tuna/ and entering the code on the can. That’s pretty awesome, if I do say so, myself!

Ocean Naturals is good, good for you, and good for the planet. It’s affordable, too, so into my shopping cart it went. When I got home, I put together a dish that would wow my taste buds. I chose a few ingredients that really packed a punch in the flavor department, and the end result, if I do say so myself, was naturally delicious and AWESOME!

Mediterranean Tuna Salad

#shop #oceannaturals meditteranean tuna salad 1

serves: 18 as an appetizer or 6 as a main dish

  • (1) 14.5 oz can chicken broth
  • 1/4 cup water
  • (2) cups couscous
  • (1) head broccoli florets (roughly 3 cups), cut into bite-size pieces
  • (2) 6 oz cans Ocean Naturals tuna in water, drained (I used Skipjack)
  • 1/2 cup kalamata olives, pitted and finely chopped
  • 1/4 cup sun-dried tomatoes packed in oil, roughly chopped
  • 1/4 cup fresh parsley, chopped
  • 1/4 cup feta cheese crumbles, plus more for topping
  • 1/3 cup olive oil
  • 2 1/2 Tbsp lemon juice
  • 1 clove garlic, finely chopped
  • 1/2 tsp salt

1. Bring broth and water to a boil in a stock pot. Once boiling, add couscous, stir, cover and reduce heat to low. Cook for 12-15 minutes, and then remove pot from heat, open the lid, and stir the couscous every few minutes to help it cool down.

#shop #oceannaturals meditteranean tuna salad 2

2. While the couscous is cooking, place broccoli florets in a microwave-safe dish, add 2 Tbsp of water, cover, and microwave for 2 1/2 minutes.

#shop #oceannaturals Mediterranean tuna salad 3

3. After the couscous is no longer hot (warm is ok), transfer it to your serving bowl. Add broccoli, tuna, olives, sun-dried tomatoes, parsley, and 1/4 cup feta cheese. Stir to combine.

4. Combine olive oil, lemon juice, garlic and salt in a bowl. Once mixed together, pour over the dish, then give it another good stir to combine. Add additional feta cheese on top, if desired. Serve immediately, or chill and serve cold.

#shop #oceannaturals Mediterranean tuna salad 4

Free Tuna Alert!

Ocean Naturals is currently holding a Tuna Tuesdays Facebook giveaway, and their readers are winning free product, so you should get in on that by heading over to their Facebook page! There are 12 winners every week, and you should be one of them!

A Little Pinspiration

If you are looking for more tuna recipes that can help you put together healthy lunches or healthy dinners, you’ll find a TON of inspiration on Pinterest! Check it out and pin your favorites!


Filed Under: The Kitchen · Tagged: canned tuna recipes, healthy tuna recipe, healthy tuna recipes, healthy tuna salad, healthy tuna salad recipe, mediterranean tuna salad, ocean naturals tuna, ocean naturals tuna review, recipes, review, tuna recipes, tuna salad, tuna salad recipe

For Your Next Party: Sweet and Spicy Barbeque Meatballs

December 4, 2013 · by Tiffany Merritt · 1 Comment

I wrote this post as a Reynolds Real Mom. For more fantastic recipes with effortless clean-up, be sure to check out the Reynolds recipe page! 

For your next potluck gathering, I’ve got a very easy recipe that will be the first dish to get polished off on the buffet line! Two very surprising ingredients form the perfect sauce for these oven-baked meatballs.

sweet and spicy barbecue meatballs

Sweet and Spicy Barbecue Meatballs

Ingredients:
2.5 lbs ground chuck
2 lbs ground pork
1/2 cup breadcrumbs
2 tsp steak seasoning
1/2 tsp salt
1/4 tsp pepper
1 tsp garlic powder
2 eggs

for sauce:
1 32 oz container barbecue sauce
1 32 oz container grape jelly
hot sauce (optional)

cocktail meatballs

Preheat the oven to 375 and line 4 baking sheets with Reynolds non-stick aluminum foil. Combine the meat with all other ingredients except for the sauce and form into bite-size meatballs. Place 20 meatballs on each pan, and bake for 35 minutes or until browned all the way through.

While the meatballs are baking, pour the barbecue sauce and the grape jelly into a sauce pan and heat over medium until they are well combined. If you want your meatballs to have a little extra kick, add some hot sauce to the mix.

Once the meatballs are finished, you can slide them right off the pan an into your serving dish. Pour your sauce on top and serve immediately. The finished dish does well in the microwave if you are taking it to a party and need to reheat it.

Yield: 80 meatballs (sounds like a lot, until you see how quickly folks inhale them!)

Filed Under: The Kitchen · Tagged: baked meatballs, easy recipes, oven baked meatballs, recipe, recipes, reynolds, reynolds real moms, sweet and spicy barbecue meatballs, sweet and spicy meatballs

  • « Previous Page
  • 1
  • …
  • 3
  • 4
  • 5
  • 6
  • 7
  • …
  • 10
  • Next Page »

Connect

  • Email
  • Facebook
  • Instagram
  • Pinterest
  • Twitter

Welcome!


Grab your beverage of choice (mine is iced coffee) and let's hang out for a spell! I'm Tiffany, and I've rambunctious little girls and a fierce desire to share any tip and trick I can find to make lives with little ones a bit less hectic and a lot more fun. [Read more...]

Popular Posts

Keep Slowing Down. You’ve Got a Race to Lose

Keep Slowing Down. You’ve Got a Race to Lose

Free Summer School for Moms (You’ll Love It!)

Free Summer School for Moms (You’ll Love It!)

The Best Cheap Mattress is Also The Best Quality Mattress: A Must-Read

The Best Cheap Mattress is Also The Best Quality Mattress: A Must-Read

25+ Moana-Inspired Easter Basket Ideas

25+ Moana-Inspired Easter Basket Ideas

The Book Every Child Should Own (And How to Get a Free Copy )

The Book Every Child Should Own (And How to Get a Free Copy )

Recent Posts

  • Choosing an Engagement Ring in a Changing Landscape
  • Personalized Clothing in Family Portraits: Showcasing Unique Style
  • The Psychology of Dual-Monitor Productivity: Why It Feels Easier to Work
  • The Secret to Style Confidence – Even During the Messiest Days
  • The Science of Healthy Hair: Foundations, Care, and Everyday Styling

Search

Sponsors

Copyright © 2026 | Innovative by The Pixelista | Built on the Genesis Framework


Loading Comments...