• Home
  • About Me
  • Policies
  • Work with Me
  • Guest Posting
Stuff Parents Need

Stuff Parents Need

Easing the chaos in the nest, one find at a time.

  • Style
  • Parenting
  • Giveaways
  • The Kitchen
  • DIY Projects
  • Fun Things To Do
  • My Favorite Finds

The Shoe Brand We Have Worn All Over the World: KEEN

April 24, 2018 · by Tiffany Merritt · Leave a Comment

Thanks to KEEN and KEEN Kids for partnering with us for today’s post. As always, all thoughts and opinions are my own. 

In the last 9 months, my family has done quite a lot of adventuring! It started with a month long trip to Switzerland, followed by a 10 day adventure in central Florida, and then last month we spent two glorious weeks in Hawaii.

And through it all, each and every one of us had a workhorse pair of shoes that we primarily wore for all our hiking and exploring and walking adventures. And each pair was made by KEEN and KEEN Kids.

My sister-in-law, who has lived abroad for over 10 years now, and who goes on outdoor adventures as much as possible, suggested we look into KEEN footwear when we were first preparing for our trip abroad. She said that in her experience, this brand of shoes held up the best and could work equally well in dry or wet environments. She said it was a tremendous shoe for whatever the day might throw at you. And she was right on the money!

These sandals have really been through it all, from summer hikes in the Alps, to logging mile after mile at Walt Disney World, to exploring tide pools on the North Shore of O’ahu. I’ve actually been stopped several times by fellow travelers wanting to inquire about what shoes our family was wearing, and I’m always happy to spread the word that we love our KEEN shoes so, so much!

KEEN Kids has just launched some great new colors in the Newport sandals for summer, and my girls have been breaking in their pairs in our yard by doing a little bouldering.

Just as expected, they have been comfortable from the very first wear and I can’t wait to see what lands we will trek on with these particular shoes. If you are looking for something that can be really flexible for different types of terrain, and that can get wet without issue, yet provide toe protection and also be easy to take on and off (my 5-year-old gets her on and off in mere seconds), do check out the Newport sandal. Layah is completely obsessed with her red pair.

And Darah had a purple pair before, and was so thrilled to go another round with purple, but this time with a deeper shade.

Friends, I simply can’t say enough great things about these shoes. They have endured mud-soaked hikes to waterfalls, scorching hot pavements, and all sorts of rocky terrain, and they have held up beautifully. They are easy to wash, too! We have said over and over again that we got more than our money’s worth on each pair that we own, and that we’ll be buying these shoes for our girls from here on out. They really do help outdoor time turn into a big adventure, for the kids and grownups, alike!

Filed Under: My Favorite Finds ·

Housekeeping Hack: Clean Paws = Clean Floors

April 20, 2018 · by Tiffany Merritt · Leave a Comment

This is a sponsored post written by me on behalf of Fresh Step. All opinions are 100% mine.

Just last week my family moved into a new home. We went from 1,300 square feet of space to 3,300 square feet, which makes for so much more room to play and have fun. It also means that there is much more house to keep clean, and that, my friends, is no fun at all. We need some new processes and habits to help keep the work load to a minimum, please and thank you.

One important decision we have made is to try to keep the floors cleaner by not wearing shoes in the house. We have a home for our “daily wear” shoes right by the front door (special occasion shoes can remain in our closets). Not wearing shoes in the house makes a HUGE difference and drastically cuts down on how often we need to sweep and vacuum. It’s also better for our floors and rugs!

And there’s even a solution for our feline family members. In the past, they have certainly contributed their fair share of debris to the floors thanks to little bits of litter that are often left on their paws after using the litter box. Those little bits end up all over the house. And let’s be real, that’s pretty gross, especially if you step on them with bare feet!

Fresh Step has just come out with a low tracking litter called Fresh Step Clean Paws. I have found it easy to purchase at Walmart and have been really pleased with the results. It really seems to work, as I have noticed a decrease in the amount of litter that finds its way outside of the box, and this is all without having to sacrifice the great odor control that Fresh Step has always been known to provide.

See those clean paws? 🙂

We are now a week into living in our new house and creating our new habit of shoes off at the front door, and low tracking litter in the litter boxes. So far, it’s all working out beautifully and I have only had to vacuum and sweep once, and that was just after the movers finished up (couldn’t really ask them to take their shoes off each time they came in with a load of boxes, could I?).

I wish I had instituted this “clean paws” policy for my family in the house years ago! Do you take your shoes off as soon as you come inside? Have you tried Fresh Step Clean Paws to help reduce litter debris in your house? I’m loving it so far, and would love to hear what you think! Any other tips to share to help reduce the amount of dirt and debris in the home?

Visit Sponsors Site

Filed Under: DIY Projects ·

Two Weeks on O’ahu: One Family’s Itinerary for Maximum Fun at Minimum Expense

April 19, 2018 · by Tiffany Merritt · Leave a Comment

Dreaming of a family vacation in Hawaii? Feeling deflated about how to ever be able to afford it? Let me help by sharing our itinerary that kept our “on the ground” costs much more reasonable.

When we found super cheap flights to Hawaii ($374 each for Atlanta to Honolulu, when normally $900 and up) we decided to just take a leap and purchase them, knowing we could work out the details later. We also decided that we were going to make such a long journey worth it, so we booked a 14 day stay, since my husband had enough vacation banked at work. I homeschool our kids so we are always available to travel, as well.

I really had a blast exploring all the amazing opportunities on the island. I had on my wish list to attend a luau, to swim with dolphins, to do some guided snorkeling and to visit lots of museums and cultural centers.

And then I started looking at the ticket prices for it all and my stomach just churned! I quickly realized that we would be spending well over a thousand dollars on activities alone if we did all the things on my list. Once I realized what we were going to be spending on housing ($188/night, on average…more on that in a future post) and setting aside about $400 for food (yes, groceries are more expensive in Hawaii), there just wasn’t much money at all left over for fun activities, and certainly not as much as I was calculating we would need. Almost everything had to come off the list and I needed a new plan.

But friends, here’s the wonderful news about Hawaii: the beaches and hiking trails are some of the most breathtakingly gorgeous things to see on O’ahu, and they are either completely free, or they only require a small fee (usually to park your car). You simply need to get out of the “tourist” mindset that says you “can’t miss” XY and Z tourist destination. This isn’t to say that experiences such as these aren’t cool, but if your budget is tight, they really aren’t necessary. We were told over and over, for example, that we simply couldn’t leave O’ahu without attending a luau. Ticket prices for luaus with good reviews were $125/person, so we certainly DID leave the island without attending one, and guess what? We had a BLAST and don’t feel as though we missed out one bit!

cheap ideas for oahu

So here’s what we ended up doing during our time in O’ahu, day by day. We had a planned itinerary that varied a little bit from the final product, and that’s because it’s important to be flexible and to be willing to shift and change based on what the weather’s doing (it was overcast and windy pretty much every day when we visited at the beginning of March) or what the family simply feels up to that day, or based on new discoveries you might have accidentally discovered. Be ready and willing to simply pull over by the side of the road when you see something you want to explore!

Day 1

things to do in oahu with kids 1

  • Arrive in Honolulu.
  • Pick up rental car*
  • Go grocery shopping (we shopped at a nearby Costco, but there are several options)
  • Drive to Lanikai Beach (about 35 minutes away)
  • Arrive at our rental, unload the groceries and quickly head to the beach to get some fresh air and help keep us awake (we’d been awake for about 21 hours at that point).

Day 2

money saving ideas for vacationing in Hawaii

  • Morning hike in Lanikai Beach area (Pillbox Hike)
  • Afternoon spent at Lanikai Beach

Day 3

off the beaten path ideas for Hawaii

  • Morning at Kailua Beach
  • Special treat at Island Snow shave ice (President Obama’s favorite shave ice on the island!)
  • Afternoon hike at Makapu’u Lighthouse Trail (paved, very kid friendly)
  • Check out the nearby blowholes and tidepools on the way back home

Day 4

inexpensive destinations in Hawaii

  • Hanauma Bay Nature Preserve (spent the entire day here snorkeling and relaxing!) (Cost $7.50 per adult, kids 12 and under are free, and $1 to park).

Day 5

hiking trails for families Oahu

  • Catch a gorgeous sunrise on Lanikai Beach (watch your weather for the best day to do this; you won’t regret it!)
  • Waterfall hike at Nu’uanu Pali State Wayside (state park)
  • Afternoon at Kailua Beach

Day 6

pearl harbor with kids

  • Travel to Honolulu to see Pearl Harbor (don’t miss out on the Junior Ranger program offered for a nominal fee) (we also sprang for the headsets that provide a self-guided tour at $7.50 each)
  • Quick self-guided driving tour of Honolulu historical sites (such as the royal palace)
  • Stop by Nu’uanu Pali Lookout on the way back to the condo
  • Late afternoon beach session at Lanikai Beach

Day 7

fun places to take kids in Hawaii

  • Quick morning trip to Lanikai Beach to say goodbye
  • Pack up the condo and load up the car
  • Drive to Byodo-In Temple to look around for a bit (it’s lovely!) ($5/person…worth it if you stay for an hour or more, in my opinion).
  • Picnic-style lunch in the car as we traveled and looked around the area
  • Arrive at new condo at Punalu’u Beach
  • Unpack, and go enjoy the VERY quiet beach!

Day 8

quietest beaches on oahu

  • Day to catch up on some homeschooling and some work, and simply enjoy the beach for the day

Day 9

free version of the secret beach on Oahu

  • Visit Kualoa State Park for a beach day (totally free). You will be located pretty much right next to the “secret beach” that folks pay $$$ to visit!
  • Afternoon visit to Polynesian Cultural Center marketplace to pick up a few special treats and souvenirs (it’s free to enter the marketplace!)

Day 10

alternative to polynesian cultural center

  • Quick visit to Puu o Mahuka Heiau, which is a large ancient religious temple site. Beautiful views and a good opportunity to learn more about traditional Hawaiian culture.
  • Visit Waimea Valley. It’s a very beautiful botanical gardens, cultural learning opportunities, and the opportunity to swim to a waterfall, all at a fraction of the cost of the Polynesian Cultural Center. This was our most expensive “tourist” outing, costing $48 for all 4 of us, and it was very much worth it!

Day 11

best tidepools on oahu for kids

  • Watch surfers on the Banzai Pipeline
  • Take kids to a community playground across the street from Sunset Beach
  • Visit Shark’s Cove tidepools
  • Lunch at the food truck stands across from Shark’s Cove (a bit on the pricey side for food truck fare, so you could pack a lunch instead)
  • Afternoon of swimming and relaxation at Turtle Bay (a North shore resort that is $$$$$ to stay at, but the beach, itself, is free!).

Day 12

ways to keep vacation costs down in Oahu

  • Beach day back at the condo
  • Try to catch the sunset at Sunset Beach park (we struck out)

Day 13

cheap ways to learn about Hawaiian culture

  • Another beach day at the condo (we had other plans, but we had so much fun the day prior that we decided to do it again!)
  • Late afternoon travel into Honolulu to see the Honolulu Festival parade (once a year event, and if I had to do it over again I don’t think it was worth the hassle…traffic was beyond insane).

Day 14

enjoying ko olina without staying there

  • Morning visit to the beach to say goodbye
  • Pack up and leave the condo
  • Drive down to Ko Olina to check out the lagoons by Disney Aulani (parking lots are small…as in about 20 spaces per lagoon, so get there early if you can!).
  • Check out all the resorts and hang out at the lagoons. If I had this day to do over again I would have made a beeline for the Mariott, gone through the vacation club presentation (90 minutes) and then taken advantage of the day pass you are given as a reward so we could have played in their pools. I didn’t realize that was an option until we were too short on time.
  • Head across the street to the shops at Ko Olina and get the best iced coffee of your life at Island Vintage Coffee. SOOOOO good!
  • Late afternoon in downtown Honolulu exploring while my husband had a meeting with city officials to talk shop (he works in city government).
  • Fill up the rental car with gas at Costco (best price!) and return it.
  • Back to the airport for an overnight flight back to the mainland. Aloha, Hawaii!

Are there any specific elements of our trip that you’d like to hear about in more detail? Any questions for me? I am so appreciative of all the great blog posts I read before our trip that helped me make plans, and I want to pay that forward by helping you! Please don’t hesitate to leave me a comment below.

*A Note on Renting a Car

Renting a car on O’ahu is likely to come at a cost higher than you have ever paid before for a rental (around $750 for two weeks). This reality stung something fierce when I first started pricing out options. I even poked around different chat boards to get advice on whether or not we could just use public transportation to get around the island. And you can do that, by the way. But you will make big sacrifices of time in order to do that, and ultimately I wasn’t willing to trade the extra time for the cost savings. You may reach a different conclusion. In our case, we were able to trade in about 4 years’ worth of points my husband had accumulated through a wellness program at his work (he rides his bike to work every day and earns points for that healthy choice). We were so relieved to see that he had enough to provide us with a free car rental, so that really helped our budget for the trip. You may have something similar at your work, or perhaps you have some credit card points that can be applied to a car rental. Do some digging to see if you might have something like this available, because I will tell you that having a car was absolutely critical for us. We used it every single day, and it’s how we were able to see and do so many amazing things.

Filed Under: Fun Things To Do ·

My Favorite Coffee Break Hobby (and How I Earn Money While Doing It!)

April 5, 2018 · by Tiffany Merritt · Leave a Comment

As parents, free time is one of our most precious commodities. So when we finally do have that extra thirty minutes to relax on the couch, it’s important that we’re using it wisely. One common question I get from moms and dads is how they can use that spare time to make some extra spending money.

If you’re like many parents who are looking to work from home on a flexible basis, then you’ve likely heard about paid surveys. That means you’re probably also familiar with all the questions that we have to ask when deciding whether they’re worth taking.

Today I’m going to do the work for you and recommend that you check out one of my favorite panels- Survey Junkie.

Here’s why.


Survey Junkie Is Legit

The words “scam” and “survey” often appear together on the internet. So it’s important to make sure that if you are going to sign up for a panel, you find one that’s actually legitimate. That means no lies and no hidden fees.


As the highest rated survey site on Trust Pilot, Survey Junkie is one of the most reputable panels on the internet today. It’s absolutely free to join, and you don’t have to pay anything to redeem your points. Any site that asks you otherwise should automatically raise your red flags.

With Survey Junkie, all you need to do to sign up is input your email address on this page. You can also connect via Facebook or Google.

They’ve Got A Great Rewards System

Okay, so we get that they’re trustworthy and reliable. But what will you actually get with the points you earn on the site?


This is one of the best parts of Survey Junkie. First things first, they’ve got a very low payout threshold. As soon as you earn 1,000 points ($10), you’re eligible to cash out. And when you’re ready to cash out, you can choose from several different reward options. These include both cash via PayPal or e-Gift cards to popular retailers, such as Target, Walmart, Amazon, Starbucks, Sephora, and more.

When you redeem your points successfully, you’ll receive your rewards immediately. So you don’t have to wait for an obnoxiously long time to treat yourself to that new lipstick at Sephora or finally check off the items on your Amazon wish list.

You Can Actually Make a Difference on Survey Junkie

This perk is one that’s often overlooked, but also one that every parent needs to know about.

One of the greatest advantages of Survey Junkie is that they actually want to empower you to make a difference. So they’ve created a super user-friendly interface that makes your experience on the site easy to navigate and enjoyable to use. Members have the opportunity to share their opinion about the brands that affect their families, which puts the power back in our hands to create the world we want to live in.


The first thing you’ll do after confirming your email is fill out your general profile. (And FYI, you’ll get points for doing both of these things)! This series of questions helps Survey Junkie get to know your interests, so they can match you with the best possible surveys to take. That means you’ve got a greater chance of answering questions on topics that matter to you as a parent, and to make a genuine difference to the products and services that impact your life.

If you’ve ever entertained the idea of taking paid surveys, then I highly recommend you check out Survey Junkie. It’s one of my favorite ways to make extra cash, and I’ve found the site to be fun, reliable, and empowering.

You can sign up for Survey Junkie here.

Filed Under: Fun Things To Do ·

Best Target Birthday Cakes on the Market

March 21, 2018 · by Tiffany Merritt · Leave a Comment

My family has 4 birthdays coming up in the next two months, so it’s time to get in serious party planning mode! I had no idea that Target sold birthday cakes, so today’s guest post from dessert blogger Kathleen gave me some really helpful information. If you are in the market for a great birthday cake, check out these options. Let me know in the comments if you’ve ever gotten a birthday cake at Target!


Cakes are special, especially when it comes to birthday parties. When it comes to your birthday, you will remember it, as will the people invited, so make sure the cake keeps up with the occasion. A sweet-tasting and beautifully decorated cake is the perfect ending to a birthday celebration with family and friends. Target birthday cakes come in all varieties and flavors, so you can custom create your perfect celebratory cake. Here are the best birthday cakes from Target:

Birthday party cake
1. Photo Cake Frame Cake
As it’s your birthday, your special moment, the focus should only be on you. That’s when the Target PhotoCake Frame Cake comes in handy. Edible photos become part of the birthday cake. This is a really cool idea, and the recipient will truly treasure every delicious moment. The Photo Cake Frame Cake is ideal for any celebrating age from kids to mature adults. The captured icing photo can include a real digital image and also feature writing and graphic design. If this hasn’t convinced you yet, maybe the affordable prices will. Check out the Target birthday cakes prices so you can get an idea of their offers.

2. Birthday Bear Cake
When it comes to celebrating a baby’s birthday, this treasured event should be shared with the family. Every detail matters and the cake needs to fit the baby’s milestone moment. Target has available an adorable dessert bear-shaped, ideal for any baby boy or girl. The cake features a beautiful edible design along with the announcement of “Happy Birthday.” It is such a cute cake that both the guests and the child will fall in love with.

3. Angry Birds Red Bird & Bad Piggy Cake
This is a colorful and fun cake for fans of the Angry Birds game or movie. A Target birthday cake offers a lot of amazing licensed movie characters to choose from. For this one, the birthday girl or boy will enjoy the Red Bird figurine and Bad Piggy figurine as cake toppers. The toppers stand about three inches tall and make for wonderful toys to play with after dessert. The toppers are not recommended for children under three years of age.

4. Disney Princess Happily Ever After Signature Cake
Young princesses fall in love with Target birthday cakes because their authenticity and fantastical creations are one of a kind. The happily ever after cake does not disappoint and includes the Signature Deco Set cake topper. It’s all about a pretty pink castle with turrets that spin around. Figurines like Rapunzel, Cinderella and Ariel can be placed inside a secret door.

5. Pink Roses Photo Cake Cake
When it’s her quinceanera or 15th birthday, the cake requires a special feminine appeal. Target has created the loveliest design in their pink roses theme. The sweet photo cake strip lines the body of the round, single layer cake. The pink decorations add the right touch for a young girl who wants to embrace her cultural traditions during her quinceanera party.

6. Over the Hill Banner Photo Cake
Kids aren’t the only ones who like being presented with a specially frosted, yummy cake on their birthday. Target hasn’t forgotten the adults of the world. In fact, the bakery has designed a great one called the “Over the Hill” cake. It could be appropriate for any decade when you think about it. It depends on your sense of humor. The cake features an “Over the Hill” edible graphics image in big letters with several black balloons depicted. It’s bound to be the hit of the evening.

Every birthday cake symbolizes another year of achievement in life so it definitely should be something special. birthday cakes are baked with pride, imagination and the sweetest frosting in the world so if you find yourself looking for the best bakery in town, you should definitely check them out.

Image source: 1

Filed Under: The Kitchen ·

Animoodles: A “Buildable” Stuffed Animal Experience

March 19, 2018 · by Tiffany Merritt · 1 Comment

My girls are OBSESSED with stuffed animals. It’s their favorite type of toy to play with and mama’s favorite thing to buy them, so that works out quite well, I think! With the exception of minor changes (like the current large, sparkly eyes that adorn many plushies), though, it really is a classic toy with little variation. And that can mean that for some kids, it’s rather boring.

But a team of animators and designers from Silicon Valley recently came up with something truly unique: why not make some plush friends that were also put together via magnets, which meant that different body parts could be switched out in order to make new creations?

Meet Animoodles! We were sent Iris Unicorn and Hazel Sloth to check out, and my kids very quickly picked up on the fact that these animals can actually stick to certain surfaces thanks to the magnets on their backs. So I frequently find them hanging out on our steel front door. 🙂

They have squealed and giggled and delighted over all the combinations they can make with Hazel and Iris, and of course those combination could get even more wild with the addition of a few more Animoodles (other current offerings include Randy Orangutan, Miguel Frog, and Brady Lion, and hopefully more are to come!).

When I learned about the concept, I thought it sounded fun but I was worried that the magnets would be bothersome and/or that the parts of the plush would simply be too stiff and the animals wouldn’t be at all soft and cuddly. I’m very pleased to say that I was mistaken! Yes, they are less cuddly than something without magnets in it, but I’m quite surprised by how little that actually impacts the overall look and feel of the Animoodles. I think it’s a great design and my kids are certainly enjoying them and already asking to add to their collection.

Each character can be purchased here and the price is set at $25.

If you have stuffed animals fans at home but you’d like to try something just a little outside the box, I can tell you from experience that Animoodles will be greatly enjoyed.

Filed Under: General ·

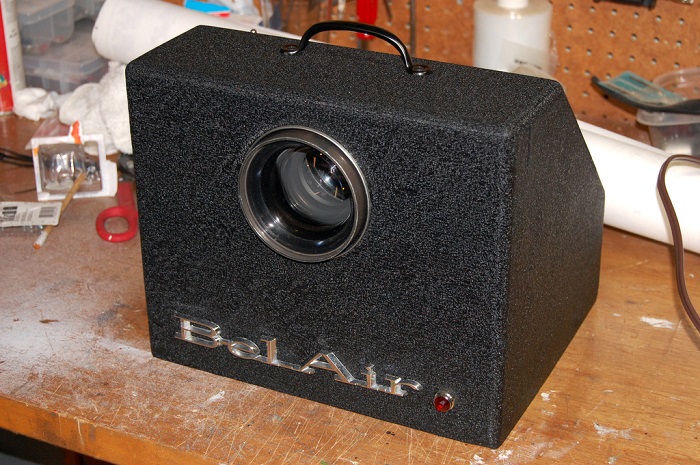
How to Make a DIY Movie Projector for Your Phone

March 19, 2018 · by Tiffany Merritt · Leave a Comment

I Love this post-vacation life hack from my contributing writer today! We were just showing photos from our recent vacation and it was tough to share via the phone so we needed to come up with a different idea! Hope this inspires you to DIY a solution for yourself, too! 

I just came back from a trip and really wanted to show the best that these pictures we’ve taken can give. That small phone screen was showing colors beautifully. Yet, it was all about the details that were so hardly visible”. This is how you may realize that you need a movie projector that can connect to your smartphone. There are plenty available in stores, but there’s also the DIY version that can save you time and money.

Looking at an image, a video or even a movie from your smartphone on a big screen might sound tempting. It has all the right reasons to be so, if you can solve this in your home. This DIY hack will turn your phone in a movie projecting tool in an hour. You will need just a few tools to make this super simple movie projector.

Image from Flikr.

Get Prepared for the DIY Movie Projector

You need around five to ten minutes to read this article and learn how to make a projector for your phone. Putting pieces together lasts around 60 minutes. Here are the tools you need:

  • Shoe box or any other box larger than your phone and taller than how wide your phone is.

  • Duct tape or glue.

  • Round magnifying glass. If it has a handle, you will need to cut it.

  • Cutter knife.

  • Pencil.

How to Make a DIY Movie Projector in 7 Steps

  1. Prepare the box by gluing or adding duct tape to the interior of the box. This way, you reinforce the flaps and corners and it will not wiggle when in use. Let it dry for 15 minutes.

  2. Place the lens on top of your box, while it’s uptight. Center it as much as possible. Then, draw its cut line with the pencil, to mark the spot.

  3. Cut the box by following the trace you’ve made above. Here’s a trick to make the cut as accurate as possible – place the cutting knife at the end of a compass and create a round hole.

  4. Position the lens before gluing or taping it, to make sure the hole matches the magnifying glass. There must be no unused space, to avoid light entering the box.

  5. Glue or tape the lens to the box. Check again if there’s any light leakage. For image clarity purposes, we recommend duct tape instead of glue, as it has more stability.

  6. Make the phone stand and place it inside the box. You can create a phone stand out of plastic, cards, wood and many other materials. However, the easiest is the one from paper clips.

  7. Adjust the phone before using it. Once you place your smartphone in the box and play a video, you will see that the image is reverted and unfocused. Enhance brightness to the maximum. Then, move the box forward or backwards to focus the image. Reorient the image by reverting the phone, using an app or personalized settings (available only on iOS).

Personalizing Your DIY Movie Projector

If you enjoy you new movie projector and plan to use it on the long run, you can personalize it with just a few hacks. If your box has a lid, you will need to cut it when placing it back, instead of turning the box upside down. Make sure the lens is fully visible through the lid.

Moreover, you can have an artistic projector by using a wooden box that you can paint fresh. Personalize the box by painting its exterior and even adding stickers. The phone stand can also be wooden and color-match the box.

The movie projector is functional for movies or TV shows if you don’t forget to charge your phone. You can do this while you’re at the above step 2. When you draw and cut the hole for the lens, make sure you also cut a very small one at the opposite end. This will be the hole you use for your phone charger wire.

Using Your DIY Movie Projector

  • Remember that you need a dark room for watching videos or pictures through a projector.

  • The image is best visible on a white wall with no colorings or decorative paintings. If you have any, remove them before using the projector. If you only cover them, you might end up with a weird image.

  • If your walls are colored, place a white sheet on the wall where you project the image.

Clean your phone screen before starting a movie and you will enjoy clear and generously colored images. The DIY projector may sound sci-fi before you learn how to create it. However, then you will notice that you get maximum results with minimum tools. The images are anything but pixelated or blurry, while the movie atmosphere is visible in your home.

You don’t need to empty your wallet or spend an entire day preparing to watch a good movie or your vacation pictures. The above DIY hack requires just a few dollars and tools you already have. Once the projector is completed, you will enjoy taking pictures and making videos even more.

Filed Under: DIY Projects ·

Hawaii Packing List for Families: What We’re Taking

February 25, 2018 · by Tiffany Merritt · 1 Comment

Affiliate links may be included at no cost to you. As always, I only promote what works for me! 

Our big two week trip to Hawaii is fast approaching! Today I wanted to share with you exactly what we are packing. I plan to update this post after to trip to let you know what I would change about the packing list if I had to do it over again, because I’m sure I didn’t get it 100% right on my first try.

Here’s some more information about our family and what we are doing in Hawaii to give some context to the packing list. We have 2 adults and 2 children in our family. We are staying for 2 weeks at condo rentals, so we do have access to a kitchen and a washer/dryer. We will have a rental car. The vast majority of our time is going to be spent at various beaches, and we also plan to do a fair amount of hiking. We aren’t doing much in the way of the more traditional “touristy” sightseeing. We will be in Hawaii during early March. For everything listed below, we needed 1 checked bag, 2 carry on bags, and 3 “personal item” totes.

hawaii packing list for a family

Clothes (per person):

  • 2 swimsuits (very strongly recommend getting rash guard swimsuits to provide extra UV protection)
  • 4 bottoms (3 of which are shorts, and 1 of which is a longer pair of pants)
  • 5 tops (for the girls it’s a combo of shirts and cotton dresses that are sporty enough that they could go on a hike. Here’s an example of a dress I’m taking).
  • 1 light “rain friendly” jacket each
  • 1 pair flip flops (got them super cheap thanks to Wikibuy)
  • 1 pair KEEN sandals (we’ve worn this brand all over the world and we swear by them!)
  • 4 pairs of underwear
  • 1 pair of pajamas
  • 4 hats
  • 1 swimsuit cover (snagged mine on ThredUp)
  • 1 shorty wet suit (I’m the only one who isn’t bringing a wet suit because I really hate how they feel on me, so I opted for a long sleeve rash guard swimsuit and some swim pants to help me not be so chilly. I also happen to be rather well insulated, 😉 I’ll be able to update you in a few weeks on whether or not this was a big mistake!).
  • 2 white dresses (I’m bringing these for our girls in case I decide to do a little photo shoot with them on the beaches one day).

Toiletries:

  • 1 shampoo bar
  • 2 bars of regular soap (1 for the bathroom and 1 for the kitchen)
  • toothbrushes
  • 2 tubes of toothpaste (the kids like a different flavor, and in the spirit of picking my battles, 2 tubes of toothpaste is fine)
  • floss (Plackers for the kids and one container of floss for the parents)
  • 1 stick of deodorant (Yes, we share. No, we don’t care if that’s gross)
  • so. much. sunscreen (I raided our supply at home, and it’s probably 8 different bottles, all with varying amounts inside…hoping to bring little to none of it back! Do remember to look for sunscreen that is reef-safe since the beaches around the islands have lots of reefs!)
  • insect repellent (we use the one from Honest Company)
  • lip balm (we use Young Living)
  • first aid supplies (band-aids, neosporin, Tylenol, essential oils for upset tummy (DiGize) and for trouble sleeping (Lavender), Dramamine, melatonin pills)
  • wet wipes (these will go on the plane with us because messes happen)
  • small bottle of hand sanitizer (also going on the plane)
  • aloe vera gel (in case we experience sunburn)
  • Vitamin E pills (lifesavers if you get sunburn…help your skin heal itself from the inside out)
  • daily vitamins/medications for each family member
  • Moroccan oil for our hair (I think 2 weeks of saltwater exposure will be brutal, and I find this oil to help our hair immensely)
  • various hair ties (3 out of 4 of us have long hair)

Electronics:

  • 2 cell phones with a charger
  • 2 tablets with charger
  • 4 pairs of earbuds/headphones
  • 1 laptop with charger
  • 1 kindle

Food:

I’m going to do a whole separate post on this topic, so stay tuned!

Other:

  • binoculars
  • motion sickness bands (helps our girls immensely on plane rides, and also are supposed to be helpful when snorkeling)
  • small bags for vomit (my oldest gets sick on planes, and I’ve learned the hard way not to count on your seat pocket to have a bag)
  • beach bag (can double as your personal item on the plane)
  • 1 water bottle per person (I’ve owned tons of different bottles, and my favorite, by far, is KOLD).
  • rubber bands (surprisingly useful in the kitchen!)
  • snack size ziploc bags (maybe 15?)
  • quart size ziploc bags (maybe 10?)
  • 2 easy lunch box containers to use when packing picnic lunches
  • 2 shell collection bags
  • catch-and-release (our kids play with this SO much at the beach. Very highly recommend)
  • various pool floats (we’ll take them to the beach). I snagged the best deals on these on Zulily by going through Wikibuy. If you’ve never tried Wikibuy it’s a must, as it helps me save a bit extra on pretty much all of my online purchases. It’s better than free because it saves you money. 🙂
  • 2 waterproof belts that will hold credit cards, ID and cell phone while swimming. I’ve been really worried about leaving these items on the beach while we swim, and found this product as a solution, with many people giving it great reviews. It will give me lots of peace of mind!
  • 1 adult full face snorkel mask
  • 1 child’s full face snorkel mask
  • 1 pair of adult snorkel fins
  • 4 pairs of sunglasses
  • 6 pairs of earplugs (I cannot sleep without earplugs thanks to years of living directly under the flight path near an airport, and right next door to a busy fire station).
  • passports for the girls (they serve as official ID)
  • 1 backpack (which will be used as Tim’s personal item on the plane)
  • laundry detergent (I’m bringing eco nuts because it takes up next to no room!)
  • dishwasher pods (bringing 10 for a 14 day trip)
  • Fels Naptha bar for stain removal on clothes (Just pack a chunk off a bar as you shouldn’t need much at all)
  • small container of liquid dish washing soap
  • sponge for the kitchen
  • mermaid tail (admittedly, totally not necessary, but we own one, so yeah…it’s going to Hawaii!)
  • school work for the girls (we homeschool)
  • travel pack of tissues
  • cotton swabs
  • tweezers
  • ice cube tray (I’m super dedicated to iced coffee, and this will also ensure we have enough ice at all times for our picnic lunch cooler)
  • insulated bag to bring food that needs to stay cold to the beach
  • baby powder (helps remove sand from your body easily)
  • beach tent (we purchased this one and feel confident that it was a great choice)
  • clamps to hold down towels over the sides of the tent
  • car seats (Bubble Bum is our pick since our girls are big enough to ride in boosters, and since these are lightweight)
  • light blanket for the plane (one kid is an anxious flyer and the blanket is soothing)
  • 1 new surprise toy for each kid on the plane (our girls are obsessed with Beanie Boos, so that’s what they will each get)

We really tried hard to pack as light as we could, while balancing out the fact that everything is significantly more expensive in Hawaii, so while it might have been easier to buy some of this stuff once we arrived, it certainly wouldn’t have been cheaper (even when you take into account spending $50 round trip on a checked bag).

I’ll keep you posted on what we learned once we got on the ground!

Filed Under: Fun Things To Do ·

Protecting Your Biggest Investment: One Step Many Home Buyers Overlook

February 21, 2018 · by Tiffany Merritt · Leave a Comment

Friends, we are in the midst of a very exciting new chapter in our lives: we have found our “forever” home! Pictures and details will follow after we close and have those keys in our hands, but for now, we are in the midst of getting everything set up to take over ownership of the property. Can’t wait to show you more! home buying tips before closing I think most everyone knows that when you buy a house, your purchase should be contingent upon an inspection to ensure that no serious problems are present with your roof, plumbing and electrical. But many people assume that an inspector also checks for termite issues, and this is not the case! You need to have a separate termite inspection conducted by a licensed pest control professional exterminator to ensure that a termite treatment isn’t needed before purchase or that termite damage hasn’t already occurred.

We have been under contract with Arrow Exterminators for several years now and have always been so impressed with the knowledge and skill of their staff, so we asked them to perform our upcoming termite inspection, as well. If you are planning on purchasing a house in the future, please make a note that you need to get your home inspected for termites prior to closing. This is one important way to protect this big investment you are about to make. And it honestly doesn’t matter what material your home is made of in determining whether or not a termite inspection is needed. Termites only need an opening about 1/32 of an inch wide to get in, and while we all know they will go through wood, they will also go through brick, stucco, stone or concrete. Don’t make the mistake of assuming that you are safe from termite problems just because your home is primarily made of a material other than wood! 

Once you have had your initial termite inspection, it’s time to ensure that you don’t have a problem down the road. Another really big mistake homeowners often make is assuming that their homeowner’s insurance will cover termite damages that might occur in the future. This is simply not the case, friends! Termites can wreak absolute havoc on the structural integrity of your home, and they can do it at lightning speed and cause you hundreds of thousands of dollars in damage, all with zero help from your insurance company. The long and short of it is that termites can ruin your biggest investment. So how do you make sure you aren’t ever in a horrible situation like this, with termite damage that is so extensive you can’t afford to repair it? You keep the termites from showing up in the first place by working with a reputable exterminator pest control company, such as Arrow Exterminators, and you stay on a contract with that company. Arrow utilizes the Sentricon® System with Always Active Technology which is a baiting system that will set up termite traps that are is extremely effective (I know from years of experience seeing them work!). Additionally, they will monitor those traps stations every year and give you a detailed report of their findings. They work really hard to make sure no termites get into your home,. So in a sense, having a termite contract is a bit like having insurance specific to this damaging pest.

It gives me a great deal of peace of mind to know that termites aren’t coming anywhere near my single biggest purchase, and that if they do, I’m not on my own to deal with it. So the big takeaways for those of you thinking about buying are to get the home inspected for termites before you sign on the dotted line at closing, and for those of you who already own a home, make sure you are on a termite contract to protect your home from these awful invaders. Your homeowner’s insurance will be of no help if you find damage down the road!

Filed Under: My Favorite Finds ·

  • « Previous Page
  • 1
  • …
  • 21
  • 22
  • 23
  • 24
  • 25
  • …
  • 326
  • Next Page »

Connect

  • Email
  • Facebook
  • Instagram
  • Pinterest
  • Twitter

Welcome!


Grab your beverage of choice (mine is iced coffee) and let's hang out for a spell! I'm Tiffany, and I've rambunctious little girls and a fierce desire to share any tip and trick I can find to make lives with little ones a bit less hectic and a lot more fun. [Read more...]

Popular Posts

Keep Slowing Down. You’ve Got a Race to Lose

Keep Slowing Down. You’ve Got a Race to Lose

Free Summer School for Moms (You’ll Love It!)

Free Summer School for Moms (You’ll Love It!)

The Best Cheap Mattress is Also The Best Quality Mattress: A Must-Read

The Best Cheap Mattress is Also The Best Quality Mattress: A Must-Read

25+ Moana-Inspired Easter Basket Ideas

25+ Moana-Inspired Easter Basket Ideas

The Book Every Child Should Own (And How to Get a Free Copy )

The Book Every Child Should Own (And How to Get a Free Copy )

Recent Posts

  • Choosing an Engagement Ring in a Changing Landscape
  • Personalized Clothing in Family Portraits: Showcasing Unique Style
  • The Psychology of Dual-Monitor Productivity: Why It Feels Easier to Work
  • The Secret to Style Confidence – Even During the Messiest Days
  • The Science of Healthy Hair: Foundations, Care, and Everyday Styling

Search

Sponsors

Copyright © 2026 | Innovative by The Pixelista | Built on the Genesis Framework


Loading Comments...